A subscription to JoVE is required to view this content. Sign in or start your free trial.
Microbial Control and Monitoring Strategies for Cleanroom Environments and Cellular Therapies
In This Article
Summary
The protocol summarizes the best practices to minimize microbial bioburden in a cleanroom environment and includes strategies such as environmental monitoring, process monitoring, and product sterility testing. It is relevant for manufacturing and testing facilities that are required to meet current good tissue practice standards and current good manufacturing practice standards.
Abstract
A well-validated and holistic program that incorporates robust gowning, cleaning, environmental monitoring, and personnel monitoring measures is critical for minimizing the microbial bioburden in cellular therapy manufacturing suites and the corresponding testing laboratories to ensure that the facilities are operating in a state of control. Ensuring product safety via quality control measures, such as sterility testing, is a regulatory requirement for both minimally manipulated (section 361) and more than minimally manipulated (section 351) human cells, tissues, and cellular and tissue-based products (HCT/Ps). In this video, we provide a stepwise guide for how to develop and incorporate the best aseptic practices for operating in a cleanroom environment, including gowning, cleaning, staging of materials, environmental monitoring, process monitoring, and product sterility testing using direct inoculation, provided by the United States Pharmacopeia (USP<71>) and the National Institutes of Health (NIH) Alternative Sterility Testing Method. This protocol is intended as a reference guide for establishments expected to meet current good tissue practices (cGTP) and current good manufacturing practices (cGMP).
Introduction
Implementing a strong microbial monitoring program through environmental monitoring (EM), process monitoring, and product sterility testing is a regulatory requirement for current good tissue practices (cGTP) and current good manufacturing practices (cGMP) in cellular therapy laboratories1. Additionally, the United States Food and Drug Administration (FDA) expects that the laboratory performing the quality control (QC) testing of the product should also employ facilities and controls comparable to those used for aseptic filling operations2.
This protocol has four main sections: 1) Aseptic practices, including personnel gowning, cleaning, and staging of materials; 2) EM, including viable air and surface cultures and non-viable particle air monitoring; 3) process monitoring, including settling plates and gloved fingertip sampling; and 4) product sterility testing via the compendial United States Pharmacopeia (USP) <71> method3 or the NIH Alternative Sterility Testing Method4. When used together, these measures can be an effective method for ensuring that a facility remains in a state of control.
The techniques described here are not novel; however, current standards from regulators and professional organizations lack detail, which has led to an absence of microbial monitoring or the implementation of non-standardized practices, particularly in academic centers where on-site manufacturing and product sterility testing are emerging at a rapid rate1,5,6. This protocol can be used as a guide to create a microbial monitoring and control program that meets regulatory requirements when used in conjunction with end-user validation and risk assessments.
Protocol
1. Aseptic practices
- Personnel gowning for a cleanroom space
NOTE: This procedure is based on initial gowning in an unclassified space, followed by entry into an International Organization for Standardization (ISO) 8 area and then an ISO7 area. This procedure is relevant for laboratories attempting to convert existing space into a cleanroom function. Ideally, all initial gowning would occur in an ISO8 classified space (not in an unclassified space).- Secure loose hair. Wash hands, and change into scrubs (long-sleeve scrub tops and full-length scrub pants are preferable). Gather and change into cleanroom shoes with shoe covers on.
- Sanitize the hands using an alcohol-based hand sanitizer initially and then again between each of the following steps: donning non-sterile gloves and then a beard cover (for any amount of visible facial hair), if applicable. Don a non-sterile bouffant, and cover the forearms with non-sterile sleeves if long-sleeve scrub tops have not been used.
- Remove the shoe covers, stepping onto the tacky mat in front of the ISO8 anteroom door with each foot after the shoe cover has been removed. Ensure the entire foot makes contact with the tacky mat prior to entry. Discard the shoe covers, and decontaminate the gloves and door handle with 70% sterile isopropyl alcohol (sIPA). Enter the ISO8 anteroom.
- Gather a sterile hood, sterile face mask, sterile coveralls, sterile boot covers, and safety glasses. Decontaminate the gloves with 70% sIPA. Don safety glasses, and stage the materials onto a clean surface, as per step 1.5.
- Don a new pair of non-sterile shoe covers over the dedicated cleanroom shoes, and step onto the tacky mat in front of the secondary anteroom. Make sure the entirety of each foot makes contact with the tacky mat. Decontaminate the gloves with 70% sIPA. Gather the staged gowning supplies, and enter the secondary ISO7 anteroom, remaining on the dirty side of the demarcation line.
- Don the sterile hood and the sterile coverall, touching only the inside of the gowning material and ensuring the neck of the hood is tucked inside the coverall to create a complete seal. Don the secondary sterile boot covers. Decontaminate the gloves with 70% sIPA in between each donning step.
- Verify that the gowning has been donned appropriately, decontaminate the gloves with 70% sIPA, and enter the ISO7 space.
NOTE: Periodically inspect the gowning material for integrity. If compromised, exit the cleanroom immediately and re-gown.
- Donning for a biological safety cabinet (BSC)
- Gown as per step 1.1 above with these additional practices.
- Gather sterile gloves and sterile sleeves. Clean the BSC as per step 1.4, and stage the materials as per step 1.5. Decontaminate the gloves with 70% sIPA.
- Aseptically don sterile sleeves over the coverall, using thumb loops if present. Don sterile gloves over existing gloves, ensuring the cuff of the glove extends over the sterile sleeve. Decontaminate the gloves with 70% sIPA between each step. Enter the BSC.
NOTE: Periodically inspect the gowning material for integrity. If compromised, exit the cleanroom immediately and re-gown.
- Doffing of the gowning materials
- Exit the BSC, and carefully remove the top pair of gloves and sterile sleeves. Decontaminate the inner gloves with 70% sIPA.
- Enter the secondary and then primary anteroom, waiting for the door to close fully between each step. Remove the materials in the following order: outer sterile boot covers, coverall, hood, and face mask.
- Exit the primary anteroom, and remove the non-sterile gowning.
NOTE: The order of removal in the unclassified space is not important; however, the inner non-sterile shoe covers should remain on the cleanroom shoes for storage in non-classified spaces. - Sanitize the hands using an alcohol-based hand sanitizer, and return to street clothes.
- Cleaning the cleanroom surfaces and the BSC
- Assemble a handheld cleaning mop, or obtain a clean low-lint wipe. If using a low-lint wipe, fold the wipe into quarters, and rotate between each surface. Saturate the mop head or low-lint wipe with an approved disinfectant.
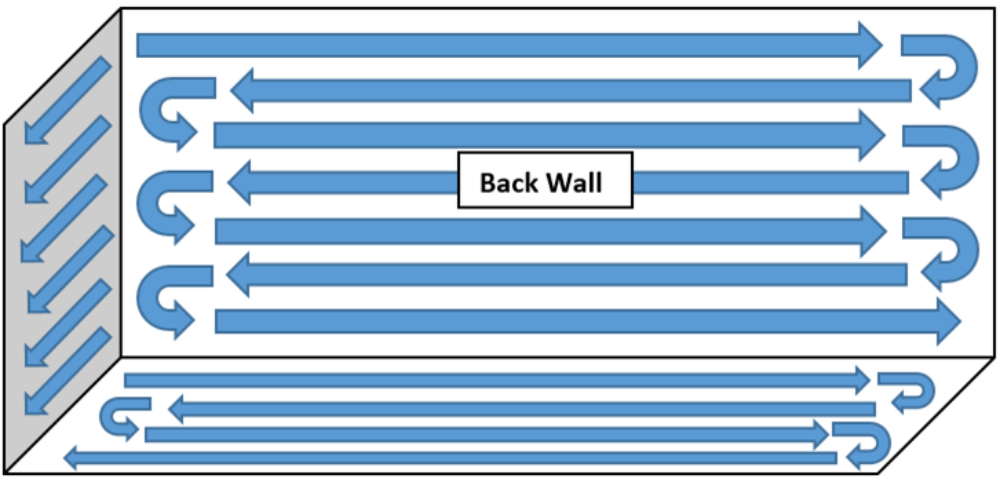
- Working from back to front (or top to bottom), clean the BSC using overlapping wipes in the following order: the HEPA diffuser grill (the top of the BSC), the back wall of the BSC, both side walls of the BSC, the sash, and the work surface. Finally, wipe the sash of the BSC using 70% sIPA to remove any residual disinfectant. Refer to Figure 1 for a typical BSC cleaning pattern.
- Staging materials and equipment into classified environments
- Decontaminate (i.e., stage) all the materials requiring transfer from a non-classified or lower-classified area to a higher-classified area (e.g., from an ISO8 to ISO7 space) to minimize the transfer of microbes. The transfer of materials between areas of the same ISO classification level does not require staging.
NOTE: If the materials have been terminally sterilized and are in multiple bags, remove the outer bag/pouch, and move the material into the classified space; wiping of the internal bag/pouch is not required. - Obtain a low-lint wipe, and fold the wipe into quarters to rotate to a clean side as the wipe becomes soiled. Saturate the wipe with 70% sIPA or an approved disinfectant.
- Wipe the exterior of the material/equipment using overlapping wipes. Ensure all the areas of the item are wiped, including the insides of pull-apart package seals and nooks/indents on the equipment and other irregularly shaped supplies. For equipment on wheels, ensure the entire wheel has been wiped during the staging process (the equipment may need to be gently tipped to allow the wheels to be rotated).
- Decontaminate (i.e., stage) all the materials requiring transfer from a non-classified or lower-classified area to a higher-classified area (e.g., from an ISO8 to ISO7 space) to minimize the transfer of microbes. The transfer of materials between areas of the same ISO classification level does not require staging.

Figure 1: Example of a BSC cleaning pattern. Working from back to front (or top to bottom), clean the BSC using overlapping wipes in the following order: the HEPA diffuser grill (the top of the BSC), the back wall of the BSC, both side walls of the BSC, the sash, and the work surface. Finally, wipe the sash of the BSC using 70% sIPA to remove any residual disinfectant. Please click here to view a larger version of this figure.
2. Environmental monitoring (EM)
- Viable surface sampling
- Stage the materials needed for the sampling session as per step 1.5, and gown into the classified space as per section 1.
NOTE: The surface sampling should be performed prior to the air sampling at any specified location. If using multiple plates to surface-sample an area, do not sample the exact same location. Use contact plates to sample flat surfaces only to ensure full contact and to avoid potential damage to the agar. - Collect and label one tryptic soy agar with lecithinase and tween (TSALT) plate and one Sabouraud dextrose agar with lecithinase and tween (SABLT) plate for each sampling site. Holding the bottom of the plate with one hand, aseptically remove the lid, being careful not to touch the raised agar surface.
- Touch the raised agar to the surface being sampled, ensuring that the entire surface is in contact, and apply firm pressure to the plate. Leave the plate in contact with the surface for at least 5 s.
- CRITICAL: Do not move the plate laterally over the surface being sampled, as this can spread potential growth over the surface area, making the resolution of individual colonies difficult. Do not exert excessive force on the contact plate during sampling, as the agar surface may crack.
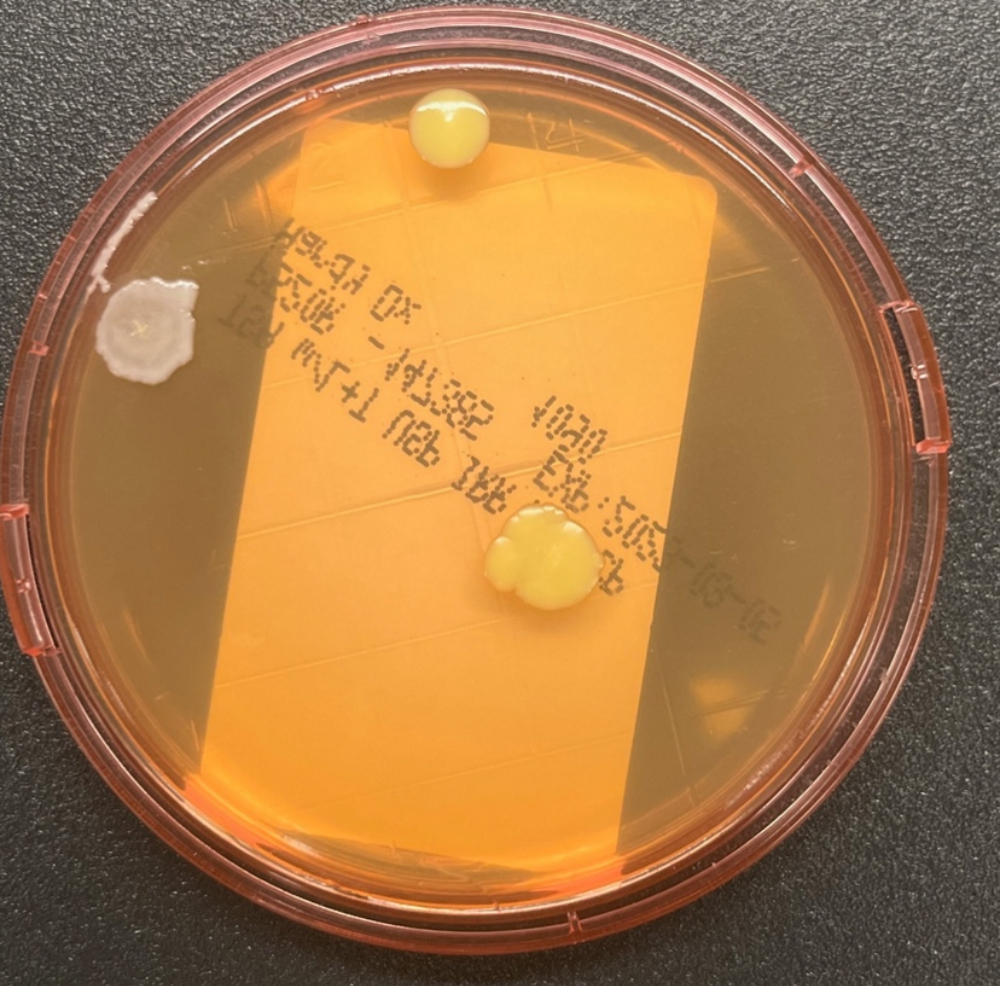
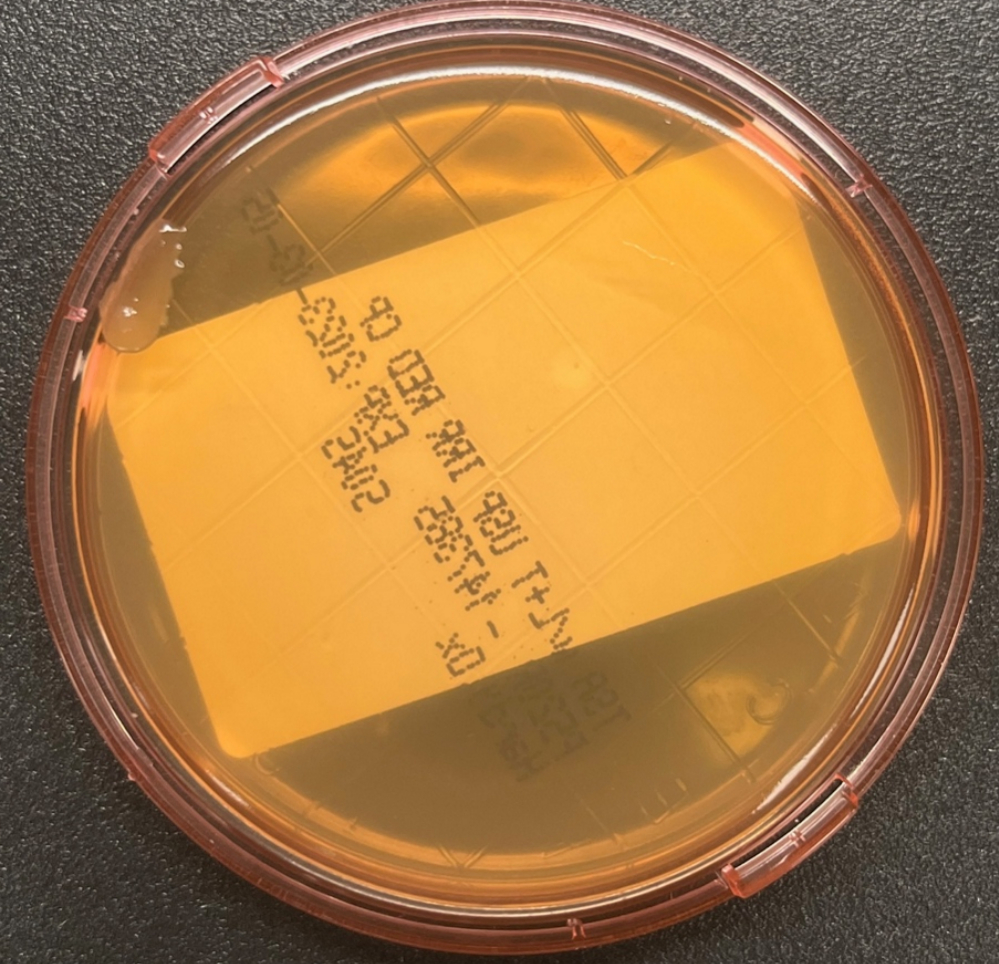
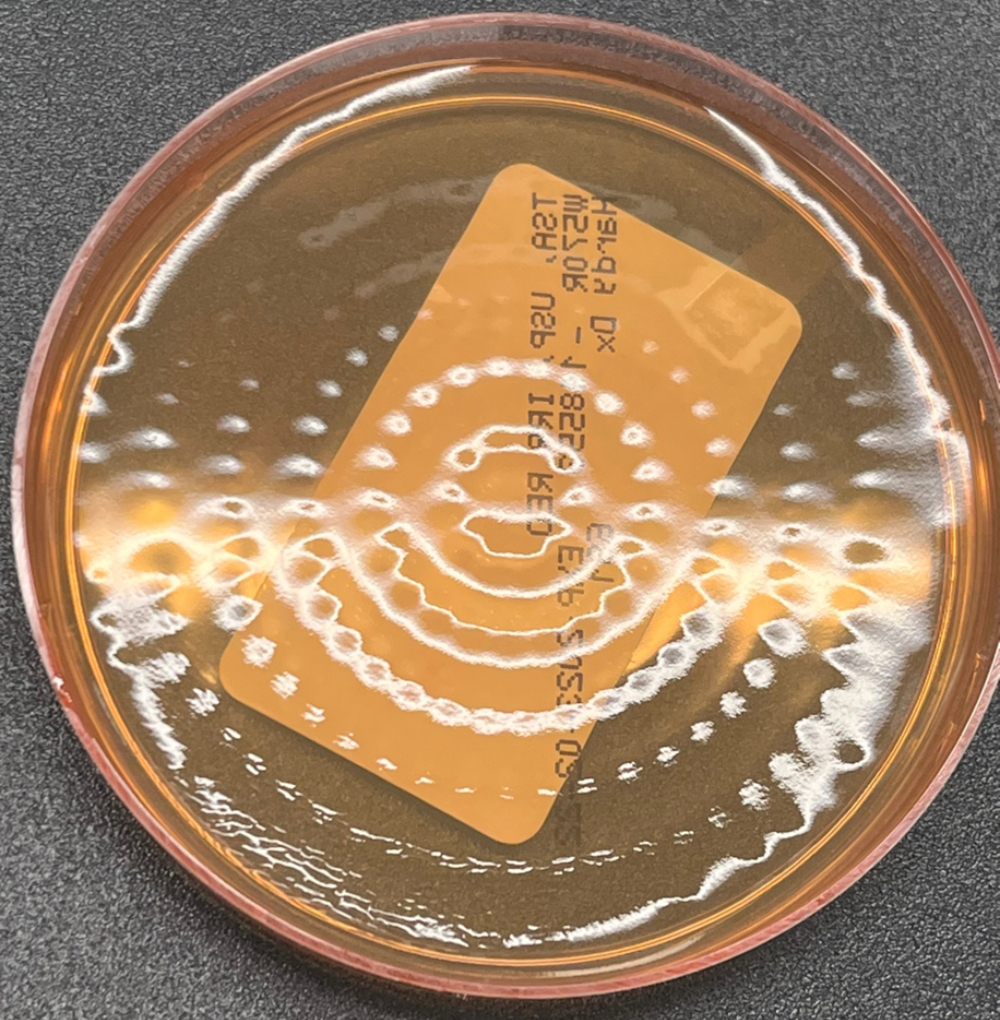
- Aseptically replace the cover, being careful to not touch the raised agar surface. Lock the cover in place if the contact plate has a locking system. Clean the sampling area with 70% sIPA to remove any residual medium from the surface. Loosely bag the plates, and incubate the cultures as described in Table 1. A representative image showing growth of three colony forming units (CFUs) with two distinct colony morphologies on a TSALT surface sampling plate is illustrated in Figure 2. Figure 3 shows contamination of a TSALT plate with growth on the edge of the plate, attributable to poor aseptic technique during sample collection.
- Stage the materials needed for the sampling session as per step 1.5, and gown into the classified space as per section 1.
- Viable air sampling
- Stage the materials needed for the sampling session as per step 1.5, and gown into the classified space as per section 1.
- Collect and label one tryptic soy agar (TSA) plate and one Sabouraud dextrose agar (SAB) plate for each sampling site. Prepare the air sampler by aseptically removing the sampling head by gripping only the outside edge to avoid contaminating the head.
- Holding the sampling head in one hand, aseptically place the medium into the plate holder on the sampler. If there is a prong that is longer than the others, insert the medium against the longer prong first, and then push the plate down into the remaining prongs to secure the plate.
- Aseptically remove the plate lid, and place it on a cleaned surface out of the way until the sampling has been completed. Aseptically replace and secure the sampling head, gripping only the outside edge to avoid contaminating the head. Repeat steps 2.2.2-2.2.4 for the remaining medium if using a multi-headed air sampler.
- Place the air sampler in the sampling location with the sampling heads facing in the predominant direction of the airflow movement. Ensure the exhaust from the non-viable air sampler (if sampling simultaneously) does not interfere with the viable sampler. Ensure that the air sampler is set to the validated settings, and start the sampling cycle.
- When the sampling cycle has been completed, aseptically remove the sampling head from the sampler by gripping only the outside edge to avoid contaminating the head. Hold the sampling head in one hand, and aseptically replace the lid of the agar plate. Remove the plate from the plate holder. Loosely bag the plates, and incubate the cultures as described in Table 1.
- Disinfect the sampling head and the area around the plate holder with 70% sIPA. Aseptically secure the sampling head, gripping only the outside edge. Repeat step 2.2.6 and step 2.2.7 for the remaining medium if using a multi-headed air sampler.
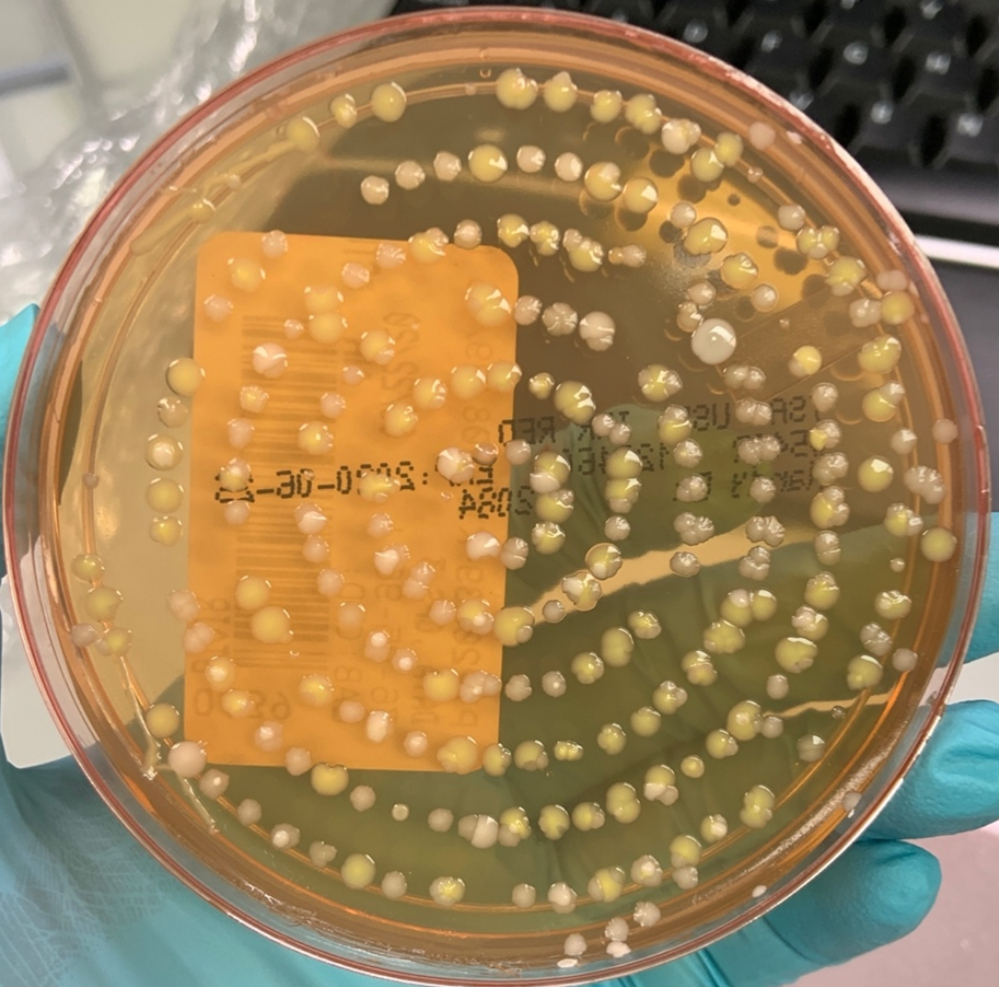
NOTE: Figure 4 shows a TSA active air sampling culture with growth caused by a contaminated sampling head. Conversely, Figure 5 represents a TSA active air sampling culture with no growth. Air impact indents from the sampling head can be seen on the image.
- Non-viable sampling
- Perform a zero check on the laser particle counter prior to the sampling activities for each day of use. Attach the isokinetic head to the sampling port of the particle counter either directly or affixed to a length of tubing as needed for the sampling location.
- If tubing is applied, use a short length, because tubing >1 m long can cause problems with enumerating particles of ≥1 µm and may also lead to unnecessary bends in the tube. Ensure the particle counter is set to the validated settings. It is recommended to set a delay of approximately 30 s to allow exit from the sampling area to avoid airflow disruption during sampling.
- Position the laser particle counter's isokinetic head in the sampling location with the isokinetic head facing into the predominant direction of airflow movement. Ensure the exhaust from the viable air sampler (if sampling simultaneously) does not interfere with the non-viable sampler. For areas where the airflow is not unidirectional or the airflow pattern is unknown, ensure the isokinetic head faces vertically upward.
NOTE: If rotational disinfectant or 70% sIPA has been aerosolized near the air sampler, wait at least 5 min before starting the sampling cycle. - Start the sampling cycle, and slowly exit the sampling area to avoid disrupting the airflow.
CRITICAL: Do not aerosolize liquids near the air sampler during a sampling cycle, as this will cause high non-viable counts. - When the sampling has been completed, retrieve the laser particle counter. Record the average particle counts for 0.5 µm. Some facilities may also track and trend 5.0 µm.
- Repeat the steps 2.3.3-2.3.6 for the next sampling location. If moving between rooms or BSCs, wipe the outside of the non-viable particle sampler with 70% sIPA or an approved disinfectant. Avoid getting disinfectant inside the isokinetic head, as this could lead to inaccurate particle counts.
| Category | Media | Culture conditions | Culture observation | Results | ||||||
| Environmental monitoring | TSA (viable air) | 30 °C-35 °C, air, for at least 3 days | End of incubation | The QA group of each facility should establish alert and action limits for each sampling type and location. Action limits for viable samples based on ISO classification can be guided using PIC/S 009-16 (Annexes) 18 and ISO-14644-1 7. Action limits for non-viable air samples are typically set to a percentage of the ISO limit (e.g., 99%). Alert limits for viable samples are typically set to a percentage of the Action limit or ISO limit (e.g., 95%). Refer to PDA TR-13 and USP<1116> for more details regarding establishment of alert and action levels and validating selected culture conditions 8,9. | ||||||
| SAB (viable air) | 20 °C-25 °C, air, for at least 7 days | |||||||||
| TSALT (viable surface) | 30 °C-35 °C, air, for at least 3 days | Representative images of EM plates are shown in Figure 2, Figure 3, Figure 4, and Figure 5. | ||||||||
| SABLT (viable surface) | 20 °C-25 °C, air, for at least 7 days | |||||||||
| Process monitoring | TSA (settling plate) | 30 °C-35 °C, air, for at least 3 days | For information only. Provides useful information in the event of an OOS investigation in response to a failed product sterility test. | |||||||
| SAB (settling plate) | 20 °C-25 °C, air, for at least 7 days | See Figure 6 for an example of a positive settling plate. | ||||||||
| Gloved fingertip sampling | TSALT | 30 °C-35 °C, air, for at least 48 hours days followed by 20 °C-25 °C for at least 5 days 19. | The acceptability criteria for GFS is <1 CFU/plate (i.e., no growth) as per PIC/S 009-16 (Annexes) 18. Acceptability criteria may be modified at the discretion of facility QA. | |||||||
| Product sterility testing | TSB (USP<71>) | 20 °C-25 °C, air, for at least 14 days | Periodically throughout the incubation period (days 3, 5, 7, and 14) | No growth. | ||||||
| FTM (USP<71>) | 30 °C-35 °C, air, for at least 14 days | |||||||||
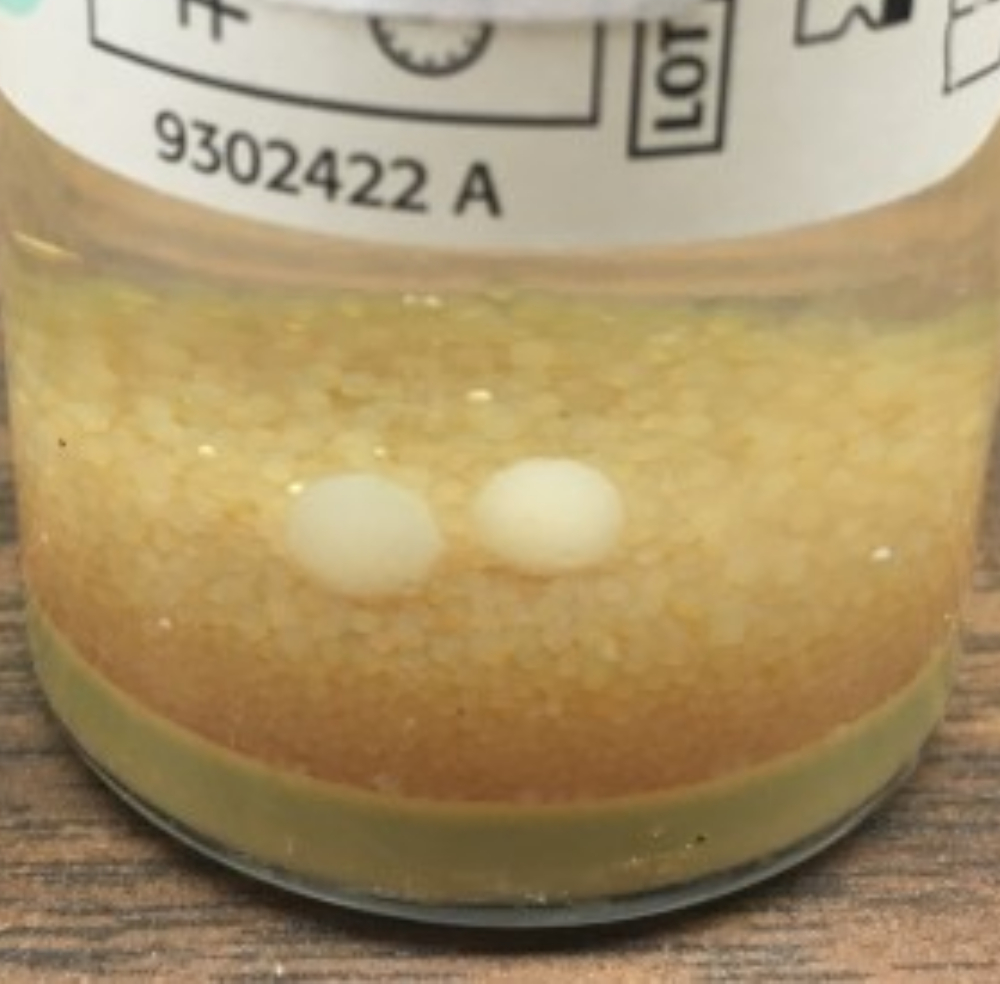
| iFA+ (NIH method) | 30 °C-35 °C, air, for at least 14 days | Monitoring automatically by the BacT/ALERT Dual-T instrument. Visual check of each bottle at the end of incubation for mold balls is strongly recommended. | See Figure 8 for an example of visible mold balls that failed to be automatically detected by the BacT/ALERT. | |||||||
| iFN+ (NIH method) | ||||||||||
| SAB (NIH method) | 20 °C-25 °C for at least 14 days | Periodically throughout the incubation period (days 3, 5, 7, and 14) | ||||||||
Table 1: Summary of the recommended culture conditions and expected results. The culture conditions described here are recommendations based on a validated program used at the NIH. Each end-user is required to validate their own microbiology testing program. The microbial control and testing strategies may differ between institutes depending on variables including the facility design, facility flora, and product risk classification.

Figure 2: Growth on the TSALT plate. The TSALT surface sampling plate showing three CFUs of two distinct colony morphologies. Please click here to view a larger version of this figure.

Figure 3: Contamination of the TSALT plate during collection. The TSALT surface culture showing a single colony on the edge of the plate, indicative of poor aseptic handling during the sampling process. Please click here to view a larger version of this figure.

Figure 4: Culture obtained using a contaminated air sampling head. Example of a TSA active air sampling culture showing >100 colony forming units (CFU) of mixed morphologies. The pattern of growth indicates contamination of the sampling head. Please click here to view a larger version of this figure.

Figure 5: No growth on a TSA active viable air plate. TSA active viable air plate illustrating no growth following incubation. Indents from the active air sampler head can be seen in the image. Please click here to view a larger version of this figure.
3. Process monitoring
- Settling plates (passive air monitoring)
- Place labeled TSA and SAB plates near the work area but in an area that will not interfere with testing. Document the sampling start time, and aseptically open both plates, placing the lids on a clean surface in the BSC away from the work area.
- The settling plates may be open for a maximum duration of 4 h to prevent the agar from drying out. Close the lids of the plates at the end of the processing. Loosely bag the plates, and incubate the cultures as described in Table 1. Figure 6 shows a single colony contaminant on a TSA air settling plate.
- Gloved fingertip sampling (GFS)
- Obtain two labeled TSALT plates. Aseptically remove the lid of one plate, and place it on a clean work surface away from the sampling area.
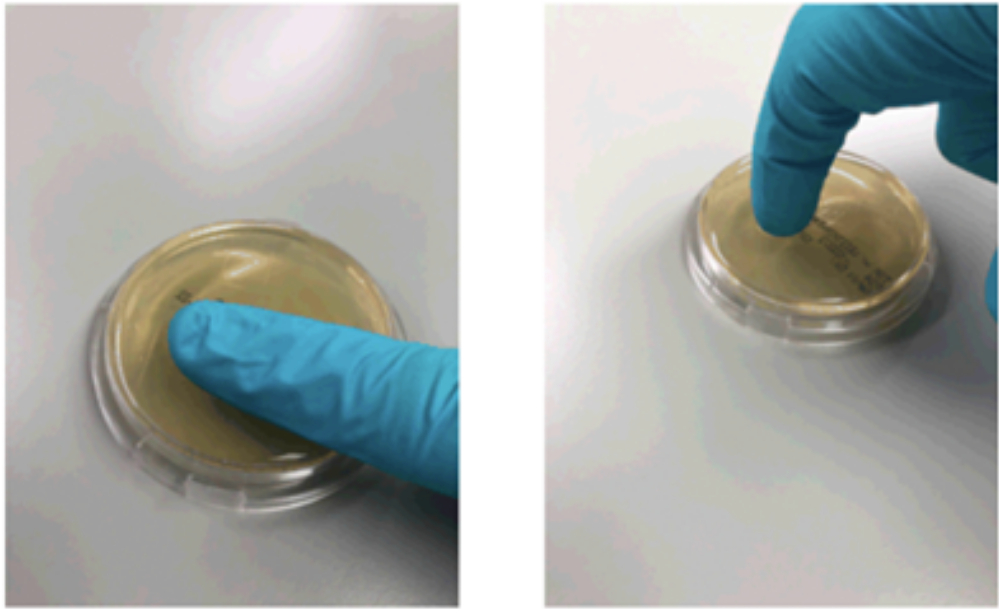
- Gently roll the pad of each finger and thumb of one hand on the surface of the plate (Figure 7). Sample the largest surface area of each finger/thumb rather than the tip. Use sufficient force to make slight depressions on the agar without cracking the agar surface.
- Aseptically place the lid back onto the plate, and repeat step 3.2.2 for the other hand. Sanitize the hands with 70% sIPA at the completion of sampling. Loosely bag the plates, and incubate the cultures as described in Table 1.

Figure 6: Growth on a TSA air settling plate. A TSA air settling plate illustrating a single colony of a contaminant cultured during passive air process monitoring in the BSC. Please click here to view a larger version of this figure.

Figure 7: Gloved fingertip sampling. The correct method for obtaining gloved fingertip samples using the largest surface area (or pad) of each finger/thumb is shown on the left. The incorrect process where only the fingertip is sampled is shown on the right. Please click here to view a larger version of this figure.
4. Sterility testing by direct product inoculation
- Direct inoculation following USP<71>
- Obtain one labeled tryptic soy broth (TSB) bottle and one labeled fluid thioglycolate medium (FTM) bottle for each test article submitted. For the testing session, obtain one TSALT and one SABLT for viable surface sampling, one TSA and one SAB plate for settling plates, and two TSALT plates for GFS.
- Gown for work inside the BSC as per step 1.2. Clean the BSC as per step 1.4. Stage the materials into the BSC as per step 1.5. Perform contact sampling of the critical work area as per step 2.1, wiping the surface with 70% sIPA after sampling. Prepare the TSA and SAB settling plates near the work area as per step 3.1.
- Obtain the test article and the associated TSB and FTM bottles. If the TSB and FTM bottles have a septum, remove the protective caps from each bottle, and wipe the septum with a sterile alcohol wipe. If the TSB and FTM bottles have a screw top, loosen the cap from the bottles (but do not remove the cap).
- Vortex the test article to ensure a homogenous suspension. Inoculate the bottles with the validated volume of the test article (up to 10 mL/bottle) using a sterile syringe and a hypodermic needle (for septum caps) or a pipettor (for screw caps).
- After inoculation, wipe the septum with a sterile alcohol wipe, and insert a sterile venting unit to allow for air exchange during incubation. For screw-top bottles, close the bottle but leave the cap 1/4 to 1/2 a turn loose to allow for air exchange during incubation. Repeat steps 4.1.3-4.1.5 for each test article to be tested within that session.
- Aseptically close the TSA and SAB settling plates, and document the sampling end time. Perform GFS as per step 3.2, wiping the gloves with 70% sIPA after sampling. Loosely bag the plates, and incubate the cultures as described in Table 1.
- Transfer all the test materials out of the BSC, and clean the BSC as per step 1.4.
- Direct inoculation following the NIH Alternative Sterility Testing Method
- Obtain one labeled iFA+, one labeled iFN+, and one SAB plate for each test article. For the testing session, obtain one TSALT and one SABLT for viable surface sampling, one TSA and one SAB plate for settling plates, and two TSALT plates for GFS.
- Gown for work inside the BSC as per step 1.2. Clean the BSC as per step 1.4. Stage the materials into the BSC as per step 1.5. Perform contact sampling of the critical work area as per step 2.1, wiping the surface with 70% sIPA after sampling. Prepare the TSA and SAB settling plates near the work area as per step 3.1.
- Obtain the test article and the associated iFA+, iFN+, and SAB plate. Remove the protective caps from the iFA+ and iFN+ bottles, and wipe the septum with a sterile alcohol wipe.
- Vortex the test article to ensure a homogenous suspension. Inoculate the bottles with the validated volume of the test article (up to 10 mL/bottle) using a sterile syringe and hypodermic needle. Wipe the septum with a sterile alcohol wipe after inoculation. Incubate the bottles on the BacT/ALERT Dual-T instrument as described in Table 1.
- Using a pipettor, inoculate the SAB plate with the validated amount of the test article (no more than 500 µL/plate), and streak for isolation using a sterile loop. Let stand for 10 min to ensure the sample does not run onto the plate lid when inverted for incubation. Place each SAB plate inoculated with the test article into a plastic bag, tie loosely, and incubate as described in Table 1.
- Aseptically close the TSA and SAB settling plates, and document the sampling end time. Perform GFS as described in step 3.2, wiping the gloves with 70% sIPA after sampling. Loosely bag the plates, and incubate the cultures as described in Table 1. Visual inspection of the BacT/ALERT bottles at the end of the incubation period is essential for detecting mold balls that may have gone undetected by the instrument (Figure 8).
- Transfer all the test materials out of the BSC, and clean the BSC as per step 1.4.

Figure 8: Growth of mold that failed to be detected by the BacT/ALERT. Example of mold balls, visible to the naked eye, that failed to be automatically detected by the BacT/ALERT system. Based on these findings, we recommend terminal visual inspection of all BacT/ALERT bottles and the addition of the SAB plate for fungal culture using the NIH Alternative Sterility Testing Method. Please click here to view a larger version of this figure.
Results
The expected results are described in Table 1. The EM data should be reviewed and followed up with an appropriate investigation and response to action, alert, or ISO limit excursions. If an excursion occurs for non-viable particles, one should proceed as per ISO 14644-Annex A, sec A.5.57. If the excursion can be attributed to an immediately identifiable abnormal occurrence, the original sampling results should be documented, a note should be added to disregard the original results...
Discussion
There are several critical areas in this protocol, including the maintenance of aseptic technique and unidirectional airflow within cleanrooms and the BSCs. Best practices include moving slowly and deliberately to minimize turbulence. Aseptic manipulations should be performed from the side of the product, not from above. Closed system processing and the use of terminally sterilized raw materials are recommended. Speaking in critical areas and leaning against walls or equipment should be avoided. Similarly, unnecessary to...
Disclosures
The authors declare no conflicts of interest.
Acknowledgements
This work was supported by the Intramural Research Program of the National Institutes of Health Clinical Center. The content is solely the responsibility of the authors and does not represent the official views of the National Institutes of Health.
Materials
| Name | Company | Catalog Number | Comments |
| 20-25°C Incubator | Lab preference | ||
| 30-35°C Incubator | Lab preference | ||
| Alcohol-based hand sanitizer | Lab preference | ||
| BacT/ALERT Dual-T instrument | BioMerieux Industry | ||
| Beard cover | Lab preference | ||
| Biosafety cabinet (BSC) | Lab preference | ||
| Cleanroom shoes | Lab preference | ||
| Fluidthioglycollate medium (FTM) | Hardy Diagnostics | U84 | USP |
| Handheld cleaning mop | Contec | 2665LF | |
| Hypodermic needle | Lab preference | ||
| iFA+ BacT/ALERT bottle | Biomerieux | 412990 | |
| iFN+ BacT/ALERT bottle | Biomerieux | 412991 | |
| Isokinetic head | Lab preference | ||
| Laser particle counter | TSI Incorporated | 9500-01 | |
| LpH III | Steris | 1S16CX | |
| Mirror | Lab preference | ||
| Non-sterile bouffant | Lab preference | ||
| Non-sterile gloves | Lab preference | ||
| Non-sterile shoe covers | Lab preference | ||
| Non-sterile sleeve covers | Lab preference | ||
| Parafilm | Lab preference | ||
| Peridox RTU | Contec | CR85335IR | |
| Plastic bag | Lab preference | ||
| Sabouraud Dextrose Agar with Lecithinase and Tween (SABLT) | Hardy Diagnostics | P595 | USP, irradiated |
| Sabouraurd Dextrose Agar (SAB) | Hardy Diagnostics | W565 | USP, irradiated |
| Safety glasses | Lab preference | ||
| Scrubs (top and bottom) | Lab preference | ||
| Spor-Klenx RTU | Steris | 6525M2 | |
| Sterile 70% isopropyl alcohol (IPA) | Decon CiDehol | 8316 | |
| Sterile alcohol wipe | Lab preference | ||
| Sterile boot covers | Kimberly Clark | Cat# varies based on size | |
| Sterile coveralls | Kimberly Clark | Cat# varies based on size | |
| Sterile face mask | Lab preference | ||
| Sterile gloves | Lab preference | ||
| Sterile hood | Kimberly Clark | Cat# varies based on size | |
| Sterile low-lint wipes | Texwipe | TX3210 | |
| Sterile mop cleaning pads | Contec | MEQT0002SZ | |
| Sterile sleeve covers | Kimberly Clark | 36077 | |
| Sterile spreading rod | Fisher Scientific | 14665231 | |
| Sterile syringe | Lab preference | ||
| Tacky mats | Lab preference | ||
| Tryptic Soy Agar (TSA) | Hardy Diagnostics | W570R | USP, irradiated |
| Tryptic Soy Agar with Lecithinase and Tween (TSALT) | Hardy Diagnostics | P520R | USP, irradiated |
| Tryptic Soy Broth (TSB) | Hardy Diagnostics | U46 | USP |
| Tubing | Lab preference | ||
| Vesphene III | Steris | 1S15CX | |
| Viable air sampler | Hardy Diagnostics | BAS22K | |
| Vortex | Lab preference |
References
- Cundell, T., Atkins, J. W., Lau, A. F. Sterility testing for hematopoietic stem cells. Journal of Clinical Microbiology. , (2023).
- United States Food and Drug Administration. Guidance for Industry. Sterile Drug Products Produced by Aseptic Processing - Current Good Manufacturing Practice. United States Food and Drug Administration. , (2004).
- United States Pharmacopeia - National Formulary. USP<71> Sterility Tests in USP43-NF38. United States Pharmacopeia - National Formulary. , (2022).
- England, M. R., Stock, F., Gebo, J. E. T., Frank, K. M., Lau, A. F. Comprehensive evaluation of compendial USP<71>, BacT/Alert Dual-T, and Bactec FX for detection of product sterility testing contaminants. Journal of Clinical Microbiology. 57 (2), 01548 (2019).
- Gebo, J. E. T., East, A. D., Lau, A. F. A side-by-side comparison of clinical versus current good manufacturing practices (cGMP) microbiology laboratory requirements for sterility testing of cellular and gene therapy products. Clinical Microbiology Newsletter. 43 (21), 181-191 (2021).
- Gebo, J. E. T., Lau, A. F. Sterility testing for cellular therapies: What is the role of the clinical microbiology laboratory. Journal of Clinical Microbiology. 58 (7), 01492 (2020).
- International Organization for Standardization. ISO 14644-1:2015 Cleanrooms and associated controlled environments - Part 1: Classification of air cleanliness by particle concentration. International Organization for Standardization. , (2015).
- Parenteral Drug Association. PDA Technical Report No. 13 Revised 2022 (TR 13) Fundamentals of an Environmental Monitoring Program. Parenteral Drug Association, Inc. , (2022).
- United States Pharmacopeia - National Formulary. USP<1116> Microbiological Evaluation of Cleanrooms and Other Controlled Environments in USP43-NF38 2S. United States Pharmacopeia - National Formulary. , (2020).
- Guinet, R., et al. Multicenter study on incubation conditions for environmental monitoring and aseptic process simulation. PDA journal of pharmaceutical science and technology. 71 (1), 43-49 (2017).
- Gordon, O., Berchtold, M., Staerk, A., Roesti, D. Comparison of different incubation conditions for microbiological environmental monitoring. PDA Journal of Pharmaceutical Science and Technology. 68 (5), 394-406 (2014).
- Anders, H. J., et al. Multisite qualification of an automated incubator and colony counter for environmental and bioburden applications in pharmaceutical microbiology. PDA Journal of Pharmaceutical Science and Technology. , (2022).
- United States Pharmacopeia - National Formulary. USP<1072> Disinfectants and Antiseptics. United States Pharmacopeia - National Formulary. , (2020).
- United States Pharmacopeia - National Formulary. USP<1071> Rapid Microbial Tests for Release of Sterile Short-Life Products: A Risk-Based Approach in USP43-NF38 2S. United States Pharmacopeia - National Formulary. , (2020).
- United States Pharmacopeia - National Formulary. PUSP<1223> Validation of Alternative Microbiological Methods in USP43-NF38 2S. United States Pharmacopeia - National Formulary. , (2020).
- Parenteral Drug Association. PDA Technical Report No. 33, Revised 2013 (TR 33) Evaluation, Validation and Implementation of Alternative and Rapid Microbiological Methods. Parenteral Drug Association, Inc. , (2013).
- Putnam, N. E., Lau, A. F. Comprehensive study identifies a sensitive, low-risk, closed-system model for detection of fungal contaminants in cell and gene therapy products. Journal of Clinical Microbiology. 59 (11), 0135721 (2021).
- Pharmaceutical Inspection Convention & Pharmaceutical Inspection Co-operation. Guide to Good Manufacturing Practice for Medicinal Products Annexes (PE 009-16 (Annexes)). Pharmaceutical Inspection Convention & Pharmaceutical Inspection Co-operation Scheme. , (2022).
- United States Pharmacopeia - National Formulary. USP<825> Radiopharmaceuticals - Preparation, Compounding, Dispensing, and Repackaging in USP43-NF38 2S. United States Pharmacopeia - National Formulary. , (2020).
Reprints and Permissions
Request permission to reuse the text or figures of this JoVE article
Request PermissionExplore More Articles
This article has been published
Video Coming Soon
Copyright © 2025 MyJoVE Corporation. All rights reserved