Carbon and Nitrogen Analysis of Environmental Samples
Source: Laboratories of Margaret Workman and Kimberly Frye - Depaul University
Elemental Analysis is a method used to determine elemental composition of a material. In environmental samples such as soils, scientists are particularly interested in the amounts of two ecologically important elements, nitrogen and carbon. Elemental analysis by the flash combustion technique works by oxidizing the sample with a catalyst through combustion in a high-temperature chamber. The products of combustion are then reduced to N2 and CO2 and detected with a thermal conductivity detector.
Unlike other methods for total nitrogen determination (Kjeldahl method) and total carbon determination (Walkley-Black, Heanes or Leco methods), the flash combustion technique does not use toxic chemicals and is therefore much safer to use.
This video will demonstrate combustion-based elemental analysis using the Flash EA 1112 instrument from Thermo Fisher Scientific.
1. Preparation of Soil Samples
- Dry soil samples at 60 °C for 48 h.
- Pass the soil through a 2 mm x 2 mm sieve.
- Put approximately 5 g of the soil into the ball mill grinder and grind for 2 min. It is important to get a homogeneous sample since your sample size will be very small.
- Put milled soil into a small container and store in a desiccator until ready to use.
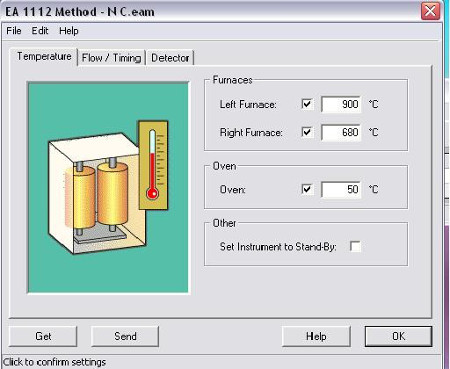
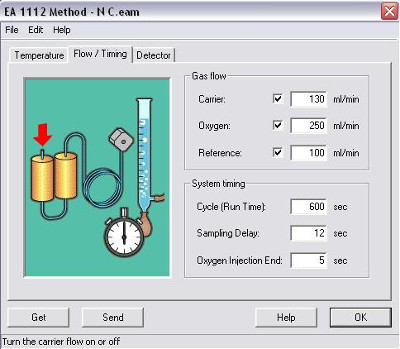
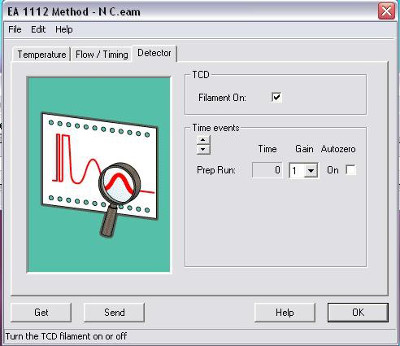
2. Setting up the Instrument Parameters
- Turn on the Flash EA 1112 in
A chromatogram for each sample is produced showing the amount of nitrogen and carbon in the sample (Figure 7).
The areas under the curve at each of the peaks in the sample chromatogram are compared to the standard curves (Figures 8 and 9), and the amount of nitrogen and carbon in the sample is calculated. Based on the weight of the original sample, the %N and %C is calculated (Figure 10).
The Carbon to Nitrogen (C:N) ratio in soil is a ratio of the mass of carbon to the mass of nitrogen in the soil sample. The C:N ratio of soil and anything put on the soil (like crop residue cover) can affect crop residue decomposition and nutrient cycling. Soil microorganisms have a C:N ratio of approximately 8:1. To maintain this ratio, they must acquire their carbon and nitrogen from the environment. However, since some of the carbon that the microorganisms acquire must be used as a source of energy in addition to what


Pular para...

Copyright © 2025 MyJoVE Corporation. Todos os direitos reservados